An installation guide taken from formr documentation and modified to include more details for those who need it.
These installation instructions are provided for Ubuntu 18.04; however, they could be modified for other systems. The original instructions suggest Debian 9, but I found this much easier on Ubuntu. I have now used both Digital Ocean and Amazon Lightsail for this installation. I don’t think the product matters, but the size of the machine is likely something you should focus on. The formr group suggests 8 virtual CPUS, but I did get it running fine with 6 CPUs.
Also, I would suggest running each line of code one at a time, as sometimes the process is interrupted to ask you questions. If you are running multiple lines, it will likely mistake your second line of code for that answer and quit (i.e., updating packages often requires you to say Y to continue).
Get the Machine
In this guide, I’ll detail Amazon Lightsail. You can use any cloud virtual machine service or a literal machine with Ubuntu on it. First, I created ssh keys for myself to be able to log to the machine from my local terminal. Every service seems to do this differently, but on Lightsail, you go to Account in the top navigation window, and there’s an option for SSH Keys.
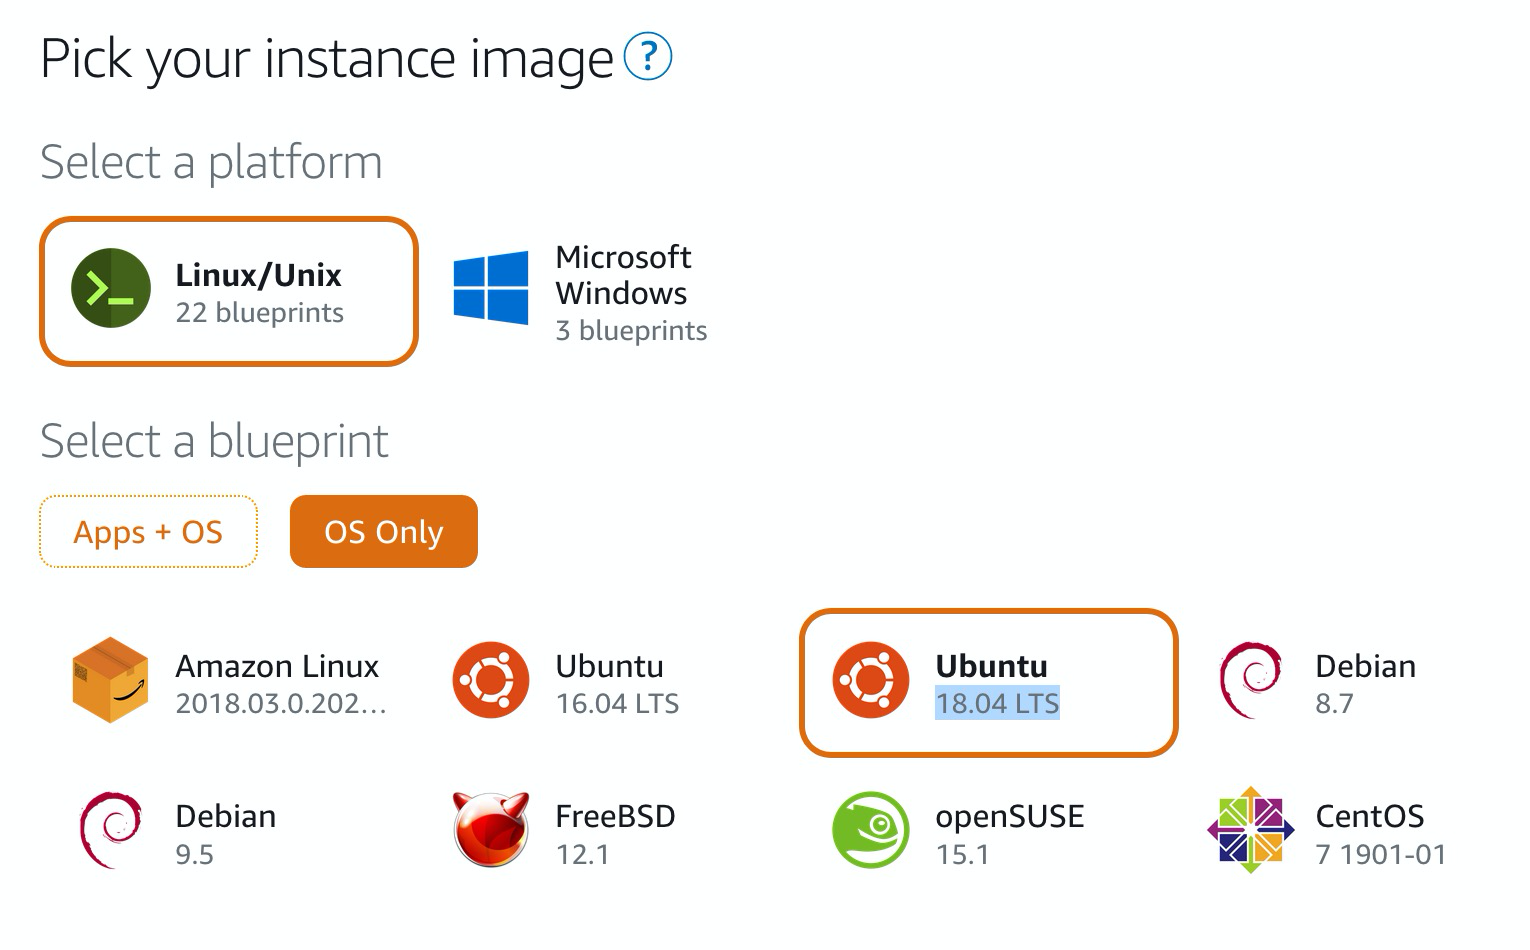
Next, I created a Lightsail instance matching the location to the SSH key I just created. I selected Linux/Unix as the platform, OS Only, and then Ubuntu 18.04.
step2
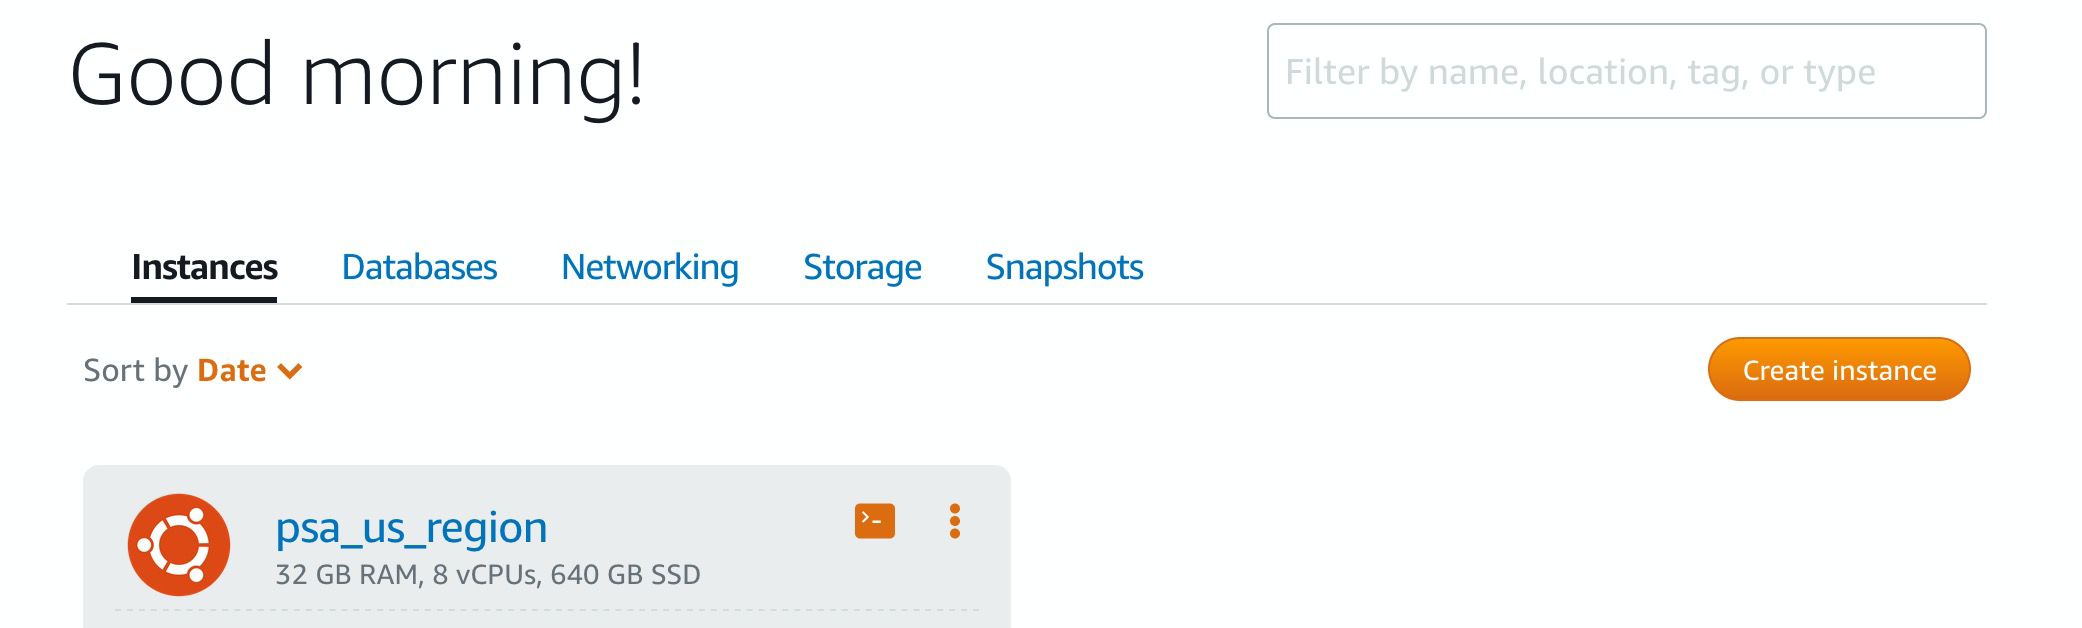
For this system, I powered it at the highest level (we have $ support for this project): 32GB RAM, 8vCPUs, 640 GB SSD, 7 TB transfer. I will be interested to see if we use this much power, but time will tell. Our project may include a lot of web hits, so went bigger, which I can scale back if it’s not necessary.
I also recommend creating a static IP address for your instance. You can find this option under networking, which allows you to insert the proper IP address into formr settings and not worry about it changing later.
Install nginx
From here I navigated to the Lightsail instance and clicked on the terminal. Since I had created the SSH key, it logged me in as root.
step3
Let’s update the server:
sudo apt-get update
sudo apt-get upgrade
PS: if it asks you about ssh installation, keep the local version. I mistakenly thought “oh I should use the newer package version”, and that caused quite the headache with being locked out of ssh. I didn’t see this at all with Digital Ocean, specifically an Amazon thing.
Now, install nginx:
Recommended Weblink for nginx reading.
sudo apt install nginx
systemctl status nginx
The last line should show you something like this:
nginx.service - A high performance web server and a reverse proxy server   Loaded: loaded (/lib/systemd/system/nginx.service; enabled; vendor preset: enabled)
  Active: active (running) since Tue 2020-03-31 16:09:39 UTC; 5min ago     Docs: man:nginx(8)
Install OpenCPU
Visit the OpenCPU repository and follow the installation instructions there on how to set up and configure OpenCPU. You can also use the PDF server guide.
Run this:
#requires Ubuntu 16.04 (Xenial) or 18.04 (Bionic)
sudo add-apt-repository -y ppa:opencpu/opencpu-2.1
sudo apt-get update
sudo apt-get upgrade
#install opencpu server
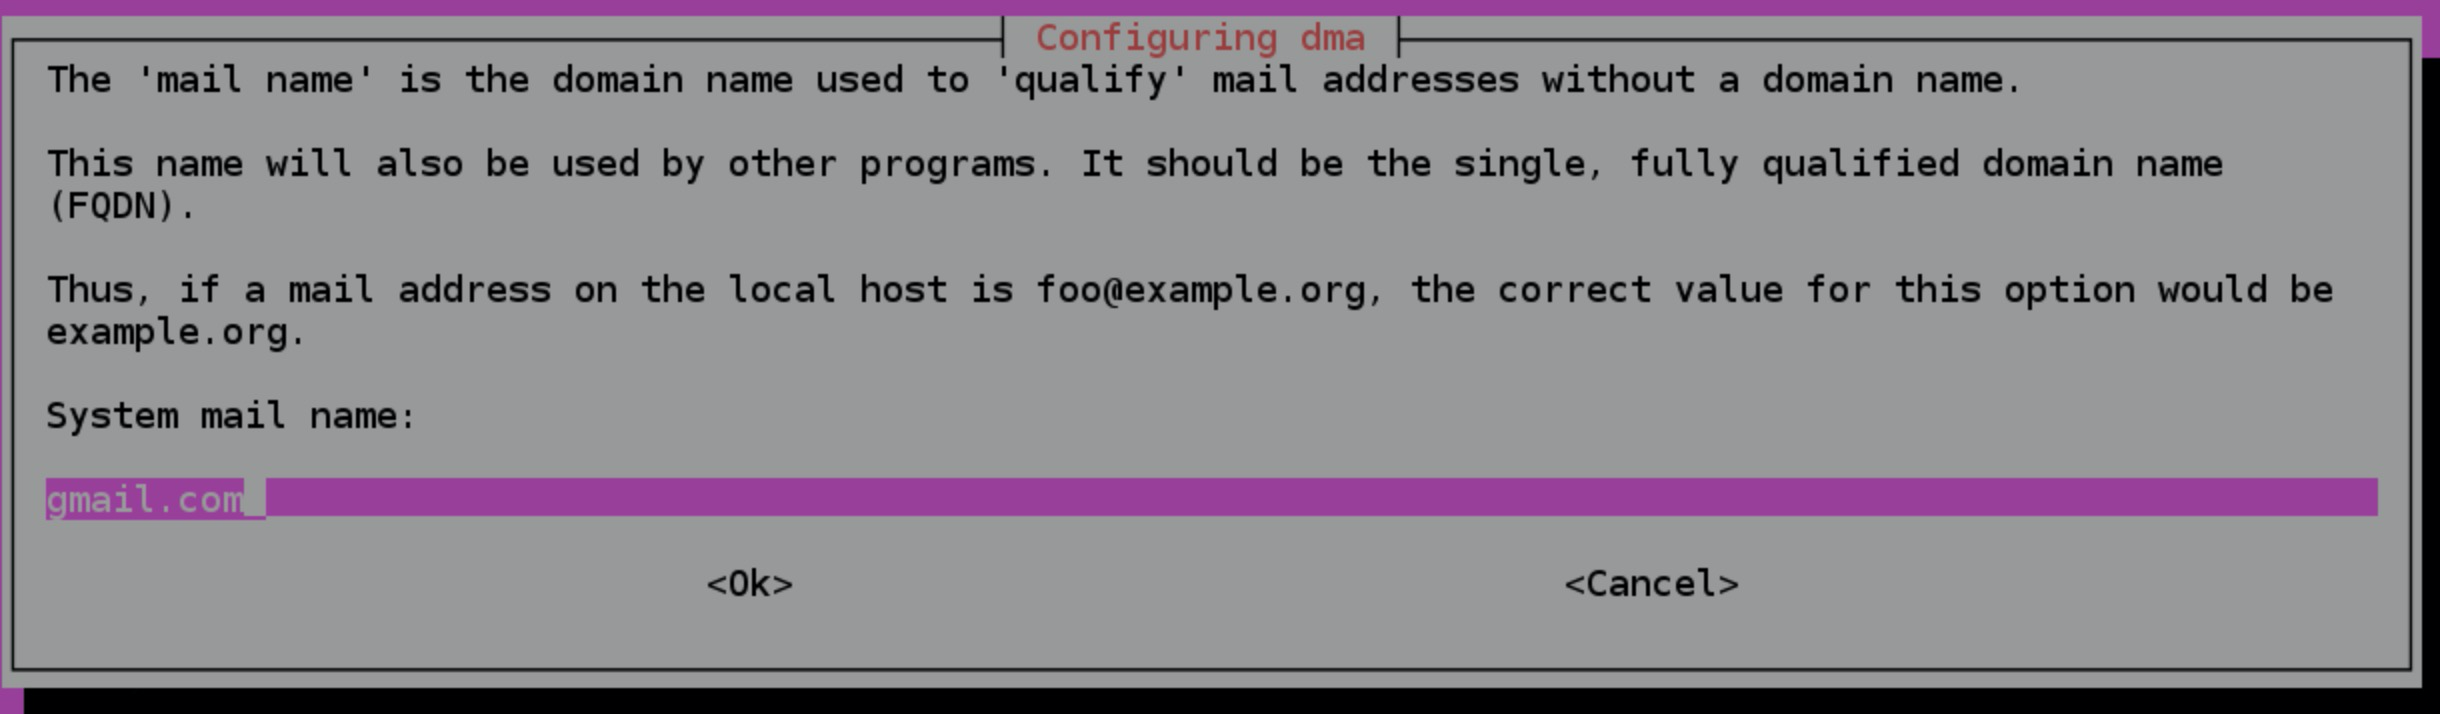
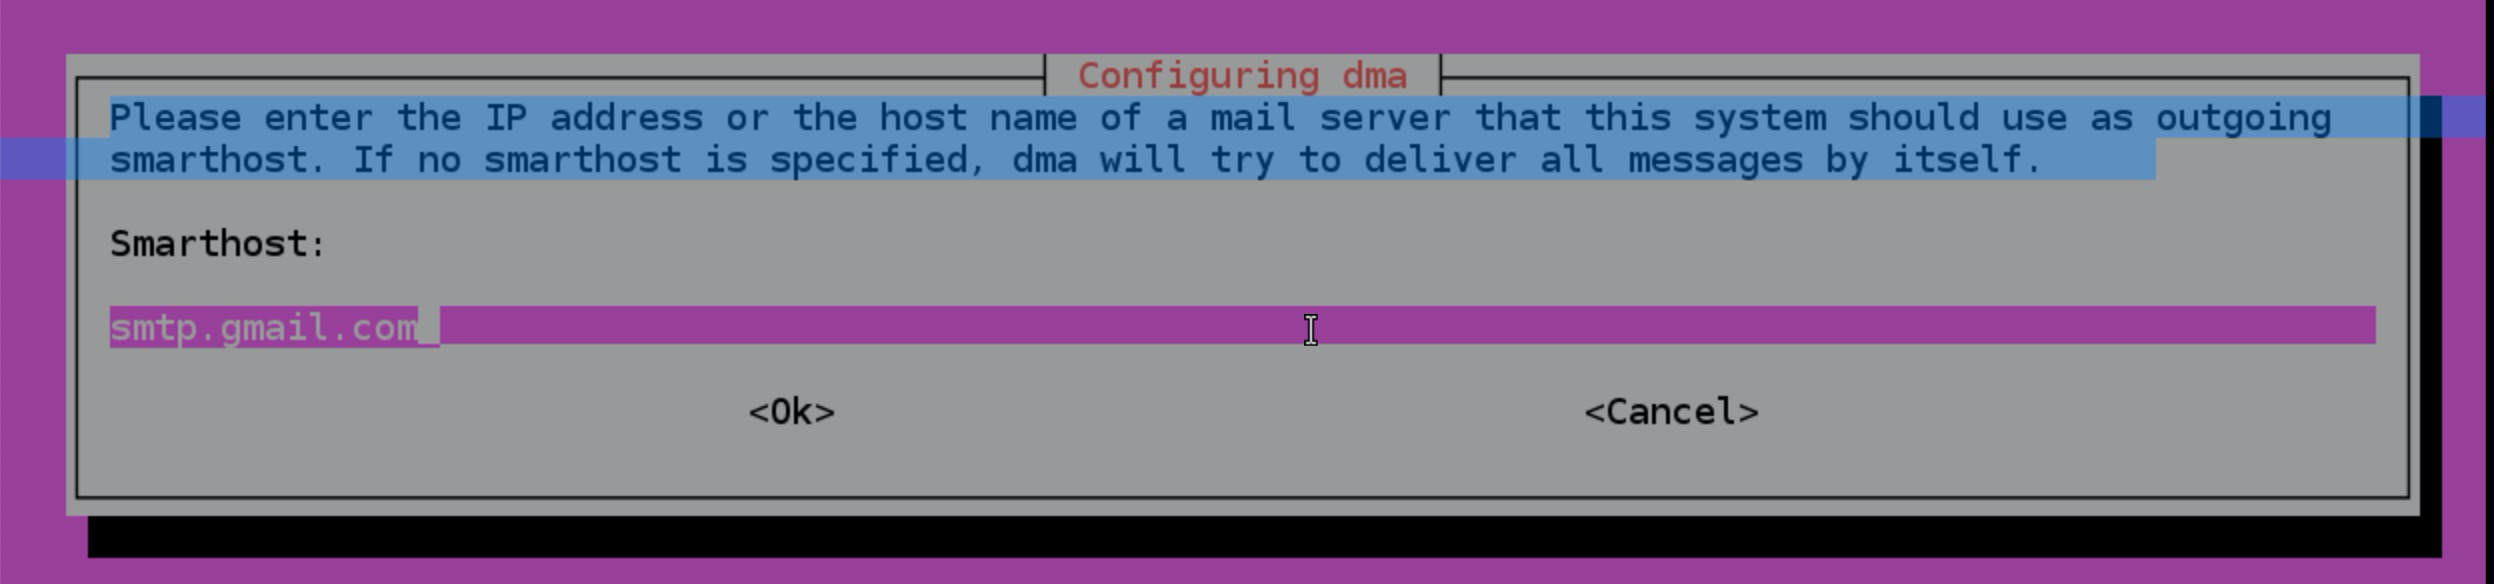
sudo apt-get install -y opencpu-serverI set up the mail information to send from gmail.com, as that’s the email I wanted to tie the instance to:
step4
step5
Before we install R packages, we will need to install a few things to help make the R packages run smoothly. This list will entirely depend on what underlying requirements there are for your R packages. If you get a non-zero exit status error, usually there’s a note somewhere above that about which underlying library is needed.
sudo apt install libgsl-devNext, we will install R packages and information to run on OpenCPU. The Apache server will be down for a bit while we work on the next couple steps.
Run the following to open R: sudo -i R. Use the following R code to install packages:
install.packages("devtools")
devtools::install_github("rubenarslan/formr", upgrade_dependencies = FALSE)
Based on the formr recommendations, I also installed: install.packages(c("codebook", "tidyverse", "pander")). You can check out what packages they have installed by looking at: this usually up-to-date list.
Exit R by using quit().
Edit Configuration
Use
sudo nano /etc/opencpu/server.confto open the configuration file for opencpu.Edit the
key_lengthsetting from 13 to 50.Also set the following packages to
"preload": ["stringr", "dplyr","knitr", "lubridate","formr", "rmarkdown"].Use
control + Xto save and exit.At this point, I realized that the next step was incorrectly listed on the formr documentation, and neglected to mention an important step of installing the cache server.
Use
sudo apt install opencpu-cacheto install the caching options fornginx.Use
sudo nano /etc/nginx/opencpu.d/ocpu.confto edit the configuration file.Replace the first complete location block with the following: (leave the robots part alone):
# OpenCPU API
location /ocpu {
        proxy_pass  http://ocpu/ocpu;
        include /etc/nginx/opencpu.d/cache.conf;
}

location ~* /ocpu/tmp/.+?/(messages|source|console|stdout|info|files/.+\.Rmd) {
        allow IP_ADDRESS_OF_YOUR_FORMR_VM;
        deny all;
        proxy_pass  http://ocpu;
        include /etc/nginx/opencpu.d/cache.conf;
}
IP_ADDRESS_OF_YOUR_FORMR_VM = the ip address of the hosted instance, which you can find right on your instance page (the IP is at the bottom right of the instance box).
- Finally, run
sudo service apache2 restart.- If you go to http://IP_ADDRESS_OF_YOUR_FORMR_VM - you should see an Apache page.
- If you go to http://IP_ADDRESS_OF_YOUR_FORMR_VM/ocpu/ - you should see an OpenCPU explore page.
Other System Requirements
Use the following code to install system requirements:
sudo apt-get install git php apache2 mysql-server composer php-curl php-fpm php-mbstring php-mysql php-zip php-xml php-gd php-intl php-xml pandoc libsodium-devUse Supervisor to control email notifications and other session monitoring. Use the following code to install:
sudo apt install python-pip
pip install supervisor
Apache needs the rewrite mod enabled, which can be added by running the following:
sudo a2enmod rewrite
sudo systemctl restart apache2
Allow overrides for the virtual machine. Put the following block on the end of the default configuration file for Apache2 using sudo nano /etc/apache2/sites-enabled/000-default.conf
    <Directory /var/www/html>
        Options Indexes FollowSymlinks MultiViews
        AllowOverride All
        Order allow,deny
        allow from all

    </Directory>
Install formr from Git
It was suggested you put formr in the /var/www/ folder. So, type cd /var/www/ to access that folder on your machine. Then type the following code:
sudo git clone https://github.com/rubenarslan/formr.org.gitCreate the link between folders and fix access rights:
sudo ln -s /var/www/formr.org/webroot /var/www/html/formr
sudo chown -R www-data:www-data /var/www/formr.org
Now that we have that installed, let’s update application dependencies by using the following code:
cd formr.org #assumes you are still in /var/www/
sudo composer install
I did see some errors here, but it’s unclear (yet!) if they matter. I did see this:
Loading composer repositories with package information
Installing dependencies (including require-dev) from lock file
Warning: The lock file is not up to date with the latest changes in composer.json.
You may be getting outdated dependencies. Run update to update them.
Package operations: 26 installs, 0 updates, 0 removals
So I tried running sudo composer update.
Using sudo here generates a message that you shouldn’t do that, which is probably true, use real users and not root.
The SQL Database
Login to your mysql server with a user that has the right privileges. I will say this part was hard because Lightsail doesn’t provide root passwords, so I had to login via: sudo mysql -uroot.
Next, run the following commands changing EnterPassword to your desired password.
  CREATE DATABASE formr DEFAULT CHARACTER SET utf8 COLLATE utf8_unicode_ci;
  GRANT ALL PRIVILEGES ON formr.* TO formr@localhost IDENTIFIED BY 'EnterPassword';
  FLUSH PRIVILEGES;
  quit;
Next, import the initial required database structure by running (remember change EnterPassword):
mysql formr -uformr -pEnterPassword < /var/www/formr.org/sql/schema.sqlNote: my password had a character that made this not run correctly, so you can also do:
mysql formr -uformr -p < /var/www/formr.org/sql/schema.sqlAnd then you will be prompted to enter your password next.
Do the same procedure to apply patches 29 and 30, as required currently.
mysql formr -uformr -p < /var/www/formr.org/sql/patches/029_run_expire_cookie_setting.sql

mysql formr -uformr -p < /var/www/formr.org/sql/patches/030_sessions_queue.sql
Configuration
Create the config folder
Duplicate (don’t rename) the folder
config-dist, name itconfig.Run
cd /var/www/formr.org/to ensure you are in the right folder.Run
sudo cp -avr config-dist configto copy the folder.You can type
lsto show the folders in this formr.org folder if you want to make sure both folders are still there.Type
sudo nano /var/www/formr.org/config/settings.phpto open the settings file.Here’s a list of everything I changed:
login => ‘formr’
password => ‘EnterPassword’ #from above!
database => ‘formr’
base_url => ‘http://IP_ADDRESS_OF_YOUR_FORMR_VM’
host (email) => ‘smtp.gmail.com’
from (email) => our gmail account
username/password for email
timezone => ‘America/New_York’
NOTE: I spent all day tracking down this stupid error: make sure sure the base_url is your IP address only not IP/ocpu.
This part was important because I have not remapped my IP/formr to be a fancy URL. If you are going to use a http://stuffandthings.com as the formr location with a cname or alias, you don’t have to do this part.
- We also needed to change where formr thinks the website is stored by opening the following:
sudo nano /var/www/formr.org/setup.php - Look for the comment
"// Global Setup", it is right above the function__formr_setup ($settings = array())declaration. - You will need to modify this line:
$doc_root = isset($_SERVER['SERVER_NAME']) ? $_SERVER['SERVER_NAME'] . '/' : '/';To be instead:
$doc_root = isset($_SERVER['SERVER_NAME']) ? $_SERVER['SERVER_NAME'] . '/formr/' : '/formr/';Set paths and permissions
- The following folders (and their sub-folders) have to be writable:
/tmpand/webroot/assets/tmp. - To do that, do:
sudo chmod -R 777 /tmp(I know 777 is not normally recommended, but this is what I had to do to get it work) - And:
sudo chmod -R 777 /var/www/formr.org/webroot/assets/tmpupdate needs to be 777 or the custom CSS will not save!
I will note I had to rerun sudo systemctl restart apache2 to get everything to start running again.
A note on emails
As I was testing everything, I was getting SMTP connect() errors. The solution was to make google less angry that I was “logging” in from a different place.
Last, here’s a section on the cron if you want to use that.
Installing the formr cron
- To install the formr crontab in a linux system:
sudo nano /var/www/formr.org/config/formr_crontab - Delete the
#from the line:\*/10 ... cron.php - Exit and then run:
ln -s /var/www/formr.org/config/formr_crontab /etc/cron.d/formr
Admin
- Go to the site and register yourself as a user.
- Since the complete layout of the formr database may not be clear to those who didn’t write it, here’s some steps you can take to understand it:
- Log in to mysql (see above).
- Run
SHOW DATABASES;to see what’s avaliable:
mysql> SHOW DATABASES;
+--------------------+
| Database           |
+--------------------+
| information_schema |
| formr              |
| mysql              |
| performance_schema |
| sys                |
+--------------------+
5 rows in set (0.00 sec)- Select the formr database by using
USE formr;. - To see what’s in that database use
SHOW TABLES;. I’m not showing the output here because it’s long, but we are likely interested heresurvey_users. When you register, it sticks you into that table. - Use
DESCRIBE survey_users;to see the columns in that table. - Use
SELECT * FROM survey_users;to see all the data in that table. - Use
SELECT admin FROM survey_users;to show that you are not an admin:
mysql> SELECT admin FROM survey_users;
+-------+
| admin |
+-------+
|     0 |
+-------+
1 row in set (0.00 sec)- To make yourself an admin, run
UPDATE survey_users SET admin = 100 WHERE id = 1;(the assumption here is that you are the only row in the table and are therefore, id number 1). - You should get a message that you updated your row but you can check it out with
SELECT admin FROM survey_users;to make sure it ran. - Now, when I log into my formr instance, I have rights to make surveys and manage users!
Some last notes
I had some issues with nginx and apache2 “stepping on each other” as my brother put it, so we changed the apache port to 8080, so nginx could use 80:
- Run
sudo nano /etc/apache2/ports.conf. - Change
Listen 80toListen 8080. - Close that file.
- Run
sudo nano /etc/apache2/sites-enabled/000-default.conf. - Change
*:80to*:8080.
Last, I had some issues with the dynamic linking formr uses because it expects the base url to be the root url (i.e. I have it ip/formr, which it expects you to just have formr at ip/).
- Run
sudo nano /var/www/formr.org/application/Library/Functions.php. - Find
function run_url(it’s way down there). - Change:
$domain = trim(Config::get('define_root.doc_root'), "\/\\");TO:
$domain = trim(WEBROOT, "\/\\");